
|
|
|
Creating a transparent outline in Photoshop Hello fellow artists! In this section I will attempt to create an easily understood tutorial on how to use Adobe Photoshop to color your artwork...at least I hope I made it easy to understand (^^;). Please keep in mind that Im no expert and this is just knowledge I have gathered over the past year, looking through sites and experimenting on my own. There are many other ways to do this of course, so dont think that this is the only way. It is rather long, but I tried to be as thorough as possible, to avoid any questions that might arise. These are the materials I used for this picture (keep in mind that you do not have to go buy what I use, I just thought it might give you some ideas on what to get next time you're at the art supply store (^_^): -Standard mechanical pencil to sketch, with Stanford Magic Rub eraser. -Strathmore 11x14 in. 50 lb. drawing pad (believe me, bigger is better ^^) -Micron pigment pens -WACOM Intuos drawing tablet (My baby ^-^) The Intuos is a pen and electronic pad that replaces the mouse. It is also pressure sensitive, so it can really simulate a pen, brush, pencil, etc. when used with photoshop or other similar graphics programs. A bit pricey but it can literally cut your time in half. *helpful hint*: When looking at auction sites such as ebay, type in the misspelling of the item you're looking for I found found my "Intous" for less than 70 dollars. ^_~ -Adobe Photoshop 6.0 First of all, remember to save periodically please. ^_~ 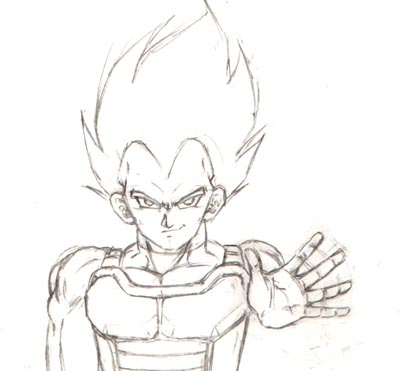
1. Sketch: As you can see, this is the sketch I created to use for this tutorial. I'm keeping the pose really simple and plan, so I can show you more easily the differences in shading, and also, how to do those nifty ki effects and blasts. The sketch in itself is really messy, but it's only temporary since you can erase the pencil marks after inking. 
2. Inking: I have now inked all the outlines using a pen and have erased all pencil marks. If you have a few mistakes, don't worry, you can touch them up once you once scanned in. 3. Scanning: Now that you have your inked outline, it's time to scan it in. Normally I scan it in Grayscale at 200 dpi so the file size won't be too large, but if the image I scanned in is particularly small, or if it's a commissioned piece, I scan it in at 300 dpi. I save it as a jpeg, but I think it really doesn't matter. 4. Photoshop: Now is the time to open up Photoshop, and open up your picture. If you zoom in really close, you might notice gray areas and faded pencil marks that you might not have seen when erasing initially. To fix this go to Image> Adjust> Brightness/Contrast. Move the Brightness arrow to the right until you can't see the gray areas anymore. Now move the Contrast to the right to darken up the outlines that might have been lightened by the Brightness. 5. Making a Transparent Outline: Okay, now I will show you how to manipulate your outline so that all the white of the paper is deleted, leaving just the black lines of the outline. This will allow you to color underneath the outline on separate layers, and will also allow you to color your outline, which adds a nice touch (I do it for most of my pictures ^-^). *There is a much easier method to do this, which I will explain in the next point, but it will only allow you to leave the outline black, which is fine. I just think this might come in handy once you become more experienced with Photoshop and you want to color your outlines. If you don't care about this, just move along ^-^.*
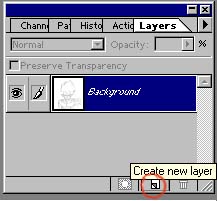
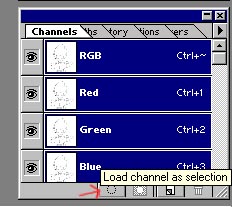
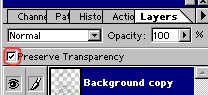
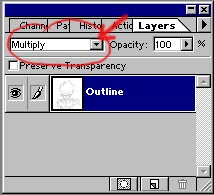
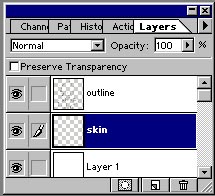
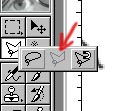
-Make sure the Layers box is open on the right hand side (Window> Show Layers). It should have a tiny thumbnail of the picture you're working on along with "Background" as the title of it. Holding the left-click button, drag the "Background" over the "Create New Layer" icon as shown in the picture. It should show that there are two layers now, "Background" and "Background Copy." Delete "Background" layer by dragging it to the little trash can at the bottom right of the layers box, or by right-click. (Note: It might be a good idea now to start renaming your layers to avoid confusion later on. You can do this by right clicking over the layer you want to rename. I will now refer to the "Background Copy" simply as "Outline.") Create a new layer (Layer 1). Make sure this layer is underneath the "Background Copy" layer. Select the paint bucket tool and choose white as your color. Select and fill "Layer 1" with white. This will act as a Background until you decide what you really want as your background. Now make sure you select the outline layer. In the same file folder box that contains the Layers section, there should be a Channels section that you want to select now; if it's not there, go to Windows> Show Channels. There are little icons at the bottom of the Channels table. The furthest one to the left is the one you must click now, which will select everything white on the outline layer. Press delete and deselect (Select> Deselect) the moving dotted lines. You may notice now that nothing changes except the picture itself looks a little light. Now go back to the Layers section. Select the outline layer. Right above it there are the words "Preserve Transparency" (5) with a tiny box to the left of it. Click on the little box and make sure there's a check on it. Now select a large size brush and with black as your color, go over all the lines shown, which if executed correctly, will make the lines a little darker. Thats it for this part. Don't worry if it seems kinda difficult, it did for me at first, but after a few tries it only takes seconds, really ^_^. 6. Outline the quick and easy way: Make sure the Layers box is open on the right hand side (Window> Show Layers). It should have a tiny thumbnail of the picture you're working on along with "Background" as the title of it. Holding the left-click button, drag the "Background" over the "Create New Layer" icon as shown in the picture. It should show that there are two layers now, "Background" and "Background Copy." Delete the "Background" layer by dragging it to the trashcan, or by right-click. (Note: It might be a good idea now to start renaming your layers to avoid confusion later on. You can do this by right clicking over the layer you want to rename. I will now refer to the "Background Copy" simply as "Outline.") Right above "Outline," on the same table in the Layers section in small font it should have the words "Normal" on it with an arrow to the right of it. Click on the arrow and select "Multiply". Everything white on the layer will become transparent, allowing you to add color from another layer underneath it, without messing up the outline. (Keep in mind this will work correctly only if you keep the Background Copy/Outline as the first layer on top at all times!) 7. Coloring: Now we can begin the early stages of coloring. First, we must section off each color on separate layers, so they will be easier to color later on when you want to darken, add highlights, etc. It is important that you do not use the magic wand tool to speed things up. This will leave numerous blank spots throughout the cg, which you do not want to do, trust me ;). Create a new layer underneath the outline Make sure the layer has the "normal" setting, especially if you're going to use the quick way to make your outline transparent. I am going to color the skin first. Since I am adding color to only to the skin on this layer, I would label the layer "skin". Now select a color that closely resembles a medium flesh color. This will be the base color. On the left side bar with all the tools, there is a lasso tool. Right click and hold the mouse over the lasso tool, and a selection of different lasso tools will show up. Select the "Polygonal lasso" tool (in the middle) now. 
Zoom in really close and with the lasso tool follow carefully along the black edges of the outline for the skin. Try not to go "outside the lines" so to speak (^^). When you meet back with where you first started with the lasso, the marching dotted lines will appear. Now either Right-click and Fill or Edit> Fill. The area you selected with the lasso should now be filled with the skin color you selected. Deselect. 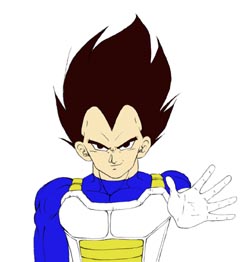
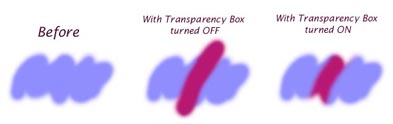
You have just finished one layer of coloring. Using the same steps I have shown you for the skin layer, create new layers for each separate color used in your picture in which I have done here, labeling them blue, yellow, black, and white, along with my skin layer. Just remember to have none of the layers above the outline layer. 8. Shading: Now it's time to add depth to your character by adding dark and lights to add dimension. I like to color cel style, which is a technique, derived from how cels are painted in actual cartoons by blocking off colors in sections. Usually these have a light, medium, and dark color for each separate color used. I will color the blue first, but you can color whichever layer you want first. I have now selected the blue layer. Click the "Preserve Transparency" box. This allows you to only color parts that are blue on that layer, without going over what is transparent. You can tell from this little demo what the differences are by having the Preserve Transparency box on or off. Now choose a shade of blue that is a couple shades darker than the medium tone that you already have. 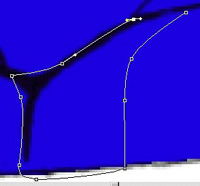
-Cel style: Select the pen tool and turn the rubber band option on under pen options. Zoom in really close and section off a part you want to be made darker. Now right click and select "Fill Subpath," and select "1" as the amount of feathering. Notice how the part I have sectioned off is darker. Right-click and delete path. Continue darkening whatever sections you want to be darkened for this color and continue with all layers, and also do the highlights as well. Remember to turn on the preserve transparency box for all of the layers. 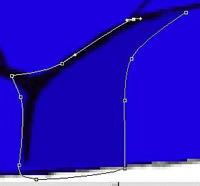
-Soft "airbrush" shading: I know a lot of people who like this style as well, so I thought Id share a few tips. The only difference between this and cel shading is that you use the airbrush tool freehanded instead of sectioning off the colors to lighten and darken like in cel style. Make sure you vary the size of airbrush and lower the pressure of the output (under airbrush options). This will allow you to gradually shade in the colors you want. For additional tweaking use the smudge tool (the index finger icon). This function will allow you to pull, stretch, and blend colors together. This can come in really handy for shading the folds in clothes. Things to avoid: The burn tool. People think that the burn tool is a short cut because it automatically darkens whatever area you use it over, without having to select another color. What it really does is de-saturates the color youre using it for and adds black to it. I can easily tell when a picture is colored only using the burn tool because the colors are muddy and gray. Handpicking the color looks much better. *It may be hard at first figuring out the placement where to darken and lighten your colors, but you get the hang of it after a while. Be observant while watching the show, to see how the actual animators section off each color, and also look at pictures on the net to help you. Remember to have a light source. Be creative and use your own ideas as well (^_^)* 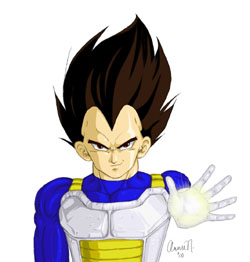
9. Adding those finishing touches: If you compare this picture to the one before, notice how I colored the outline (using the same method as coloring the skin) and added even more shading on some parts of the skin and clothing. I did this to highlight the areas the light affects from the blast. 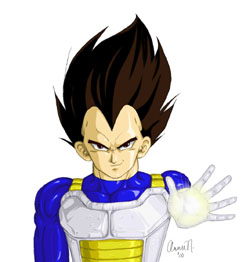
10. Background: I'll be the first to say that I'm not the best example for backgrounds ^^;. At times they can be tedious and seem unnecessary at first, but a picture looks so much better with one. You don't necessarily have to color a background in Photoshop; at times I have painted backgrounds in real media and just scanned them in and cut to fit. Even the simplistic clouds (which I have done here) look much better than just a plain flat blue. Its not absolutely necessary though. At times I have used flat colors and gradients myself. Things to avoid: The cloud filter and lens flare. Sure they look cool at first, but believe me, these two things have been overused for quite a long time now and it almost "cheapens" a picture if used. 11. Compressing as a jpeg: Now that you have finished your picture its time to save it as a jpeg so you can send it to others (^.^). Go to Layers> Flatten Image. All layers will now be compressed under one layer. Resize the image now so it will be easier for others to look at. I usually size mine so that it will fit easily in an 800x600 screen. Go to Image> Image Size, and resize the "Pixel Dimensions." Photoshop will automatically resize your picture to the length or width you desire without worrying about cutting any section off. Now you can save as a jpeg (I like to choose 8 for quality when saving). Well, there it is. I hope youre not too confused ^^; . I suggest when you first start to either have this opened in your browser as you color, or print it out so you reference it easily. -Annie Navarro
"Coloring your pictures using Adobe Photoshop" is created by Annie Navarro and may not be used for any other website. go back |